Configuring the Agent step
This topic walks through setting up an Agent step in a process, from syncing the agent through cleaning up its output. Complete the following steps:
- Sync agent
- Generate a configuration
- (Conversational agent) Add a Message step
- (Conversational agent) Add a Data Process step
- Set up authentication
Sync agent
Agents must be synced in Control Tower before use in an Agent step. Since syncing is not immediate, you can sync agents manually.
- Go to Agent Control Tower > Manage Providers > Boomi Agent Garden.
- Select the Account link, then select the Action icon > Sync Now. Syncing may take several minutes. A Success status indicates completion.
Generate a configuration
Your account must have a Boomi public cloud instance to use the Agent step.
You can generate a configuration for your first setup of the agent directly in the Agent step or select a previous configuration. The steps differ slightly depending on whether the agent uses conversational or structured response mode.
Conversational agents
- Click Generate Configuration.
- Enter a configuration name in the Configuration Name field, or accept the displayed default name.
- (Optional) Select Return Application Error Responses to prevent failed operations from appearing in Process Reporting. This option lets you handle them directly in your processes.
- Click Ok.
Add a Message step
Add a Message step before an Agent step to prompt the agent to respond.
-
Add a Message step to the canvas before the Agent step.
-
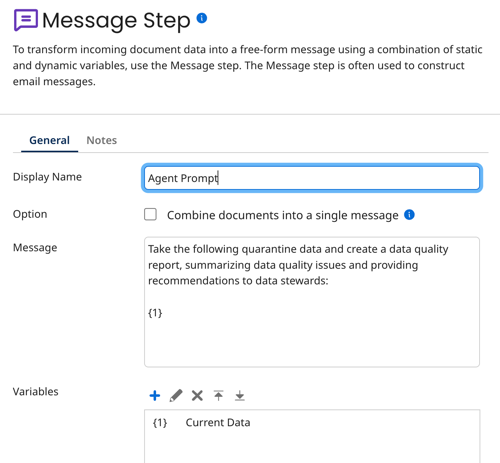
In the Message step, enter the AI agent prompt. You can copy a Conversation Starter from the agent's profile.
-
(Optional) To pass data from a previous step:
- In Variables, add a variable.
- Set Type to Current Data.
-
Select OK, then save your progress.
Add a Data Process step
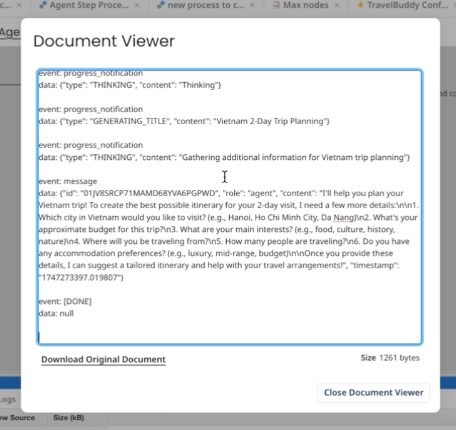
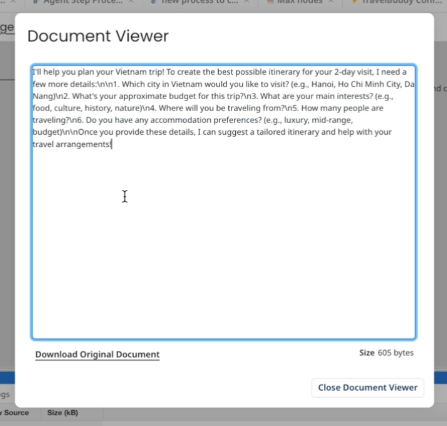
The Agent step's raw output includes event notifications and metadata alongside the agent's actual message. Use a Data Process step after the Agent step to strip that out and return only the message text.
-
Add a Data Process step to the canvas after the Agent step.
-
Under Data Process Properties, click the plus icon to add a new property and use the following configuration:
-
Processing Step - Select "Search/Replace"
-
Text to Find -
[\s\S]*event: message\n.*\"content\":\s?\"(.*)\", \"timestamp\"[\s\S]*This searches the output of the Agent step for only the message.
-
Replace With -
$1 -
Search - Select "Entire document at once"
-
-
Click OK to save the step.
Before adding the Data Process step, the Agent step's output includes event notifications and other information:
After adding the Data Process step, the output is reduced to an easy-to-read message:
If your Agent step output still includes unexpected raw data after adding this step, refer to Agent step troubleshooting.
Structured agents
For structured agents created before the November 2025 platform release, you must modify and re-sync them in Agentstudio to generate profiles in the Agent step. For newly created structured agents, you can generate profiles directly without a re-sync.
- Click Generate Configuration to generate the JSON request and response profiles.
- Enter a configuration name in the Configuration Name field, or accept the displayed default name.
- Click Sync with Agentstudio to pull the latest schemas defined in the Agentstudio.
- (Optional) Select Return Application Error Responses to prevent failed operations from appearing in Process Reporting. This option lets you handle them directly in your processes.
- Click Ok.
Video: Using Structured Agents in the Agent step
Use structured agent mode when you want the agent’s response sent to downstream systems in a predictable, formatted structure. The response is single turn, meaning the agent has a single input and output with no reference to previous responses. Refer to Structured agent mode to learn how to set this mode for your agent and examples of inputs and outputs.
The following video provides a quick overview of using structured agents in the Agent step:
Set up authentication
To invoke the agent in the Agent step, you must have a Boomi Platform API token. For more information about API tokens, refer to Adding new API Token on a user account.
Platform API Token updates apply only to the selected configuration and must be associated with your Boomi username.
- Click Click to Set and enter your API token.
- Click Apply.
After you save the configuration, you can find it in the Component Explorer and open it to configure a few other settings, such as error behavior, document archiving, tracking, and caching.
Configuration component
After generating the initial configuration in the Agent step, you can open the configuration component from the Agent's folder in the Component Explorer to view the following configuration settings:
-
Error Behavior - If checked, failed operations are not reported in Process Reporting, allowing you to act on them in your process.
-
Platform Username and Platform API Token - These are automatically populated based on the account used to create the Agent step. You do not need to configure these fields manually.
cautionModifying the Platform Username and Platform API Token fields could disrupt the connection between the Agent step and the agent.
-
Advanced Configuration (Timeouts) - You can set connection and read timeouts (in milliseconds) for the Agent step so that the process does not wait indefinitely.
